
Expense Management
Wallet · Expenses · Categories · Suppliers · Reports
What is Expense Management?
Expense Management in lilTriangle helps schools record, organize and monitor school-related expenses in one place. It provides a structured way to create expenses, categorize spending, maintain supplier details, monitor the available wallet balance and track expense activity.
The module brings together day-to-day expense records and the funds available to the school, making it easier to understand what has been spent and what balance is available. Petty cash can also be recorded as wallet balance and tracked through expense management.
What Can You Do in Expense Management?
- Create and record new expenses.
- View and track all recorded expenses.
- Create and manage expense categories.
- Create and manage suppliers/payees.
- Add money to the school wallet.
- Monitor the available wallet balance.
- View expense details and supporting information.
- Track expense status, including verification status.
- Filter and review expense records.
- Download expense reports from the Reports module.
How Expense Management Works
The overall expense flow can be understood in five simple steps:
- Add Funds – Add money to the school wallet.
- Create Expense – Record an expense with the required details.
- Categorize & Assign – Select the relevant expense category and supplier/payee.
- Balance Updates – The expense amount is deducted from the available wallet balance.
- Track & Report – Monitor expense activity and download expense reports from the Reports module.
Simple flow: Add Funds → Create Expense → Wallet Balance Updates → Track Expenses → Download Reports
Wallet Balance
Expense Management includes a wallet-based balance system for the school. The wallet provides a simple way to keep track of the funds available for expenses. Petty cash can be maintained as part of wallet balance and tracked through expenses.
How the Wallet Works
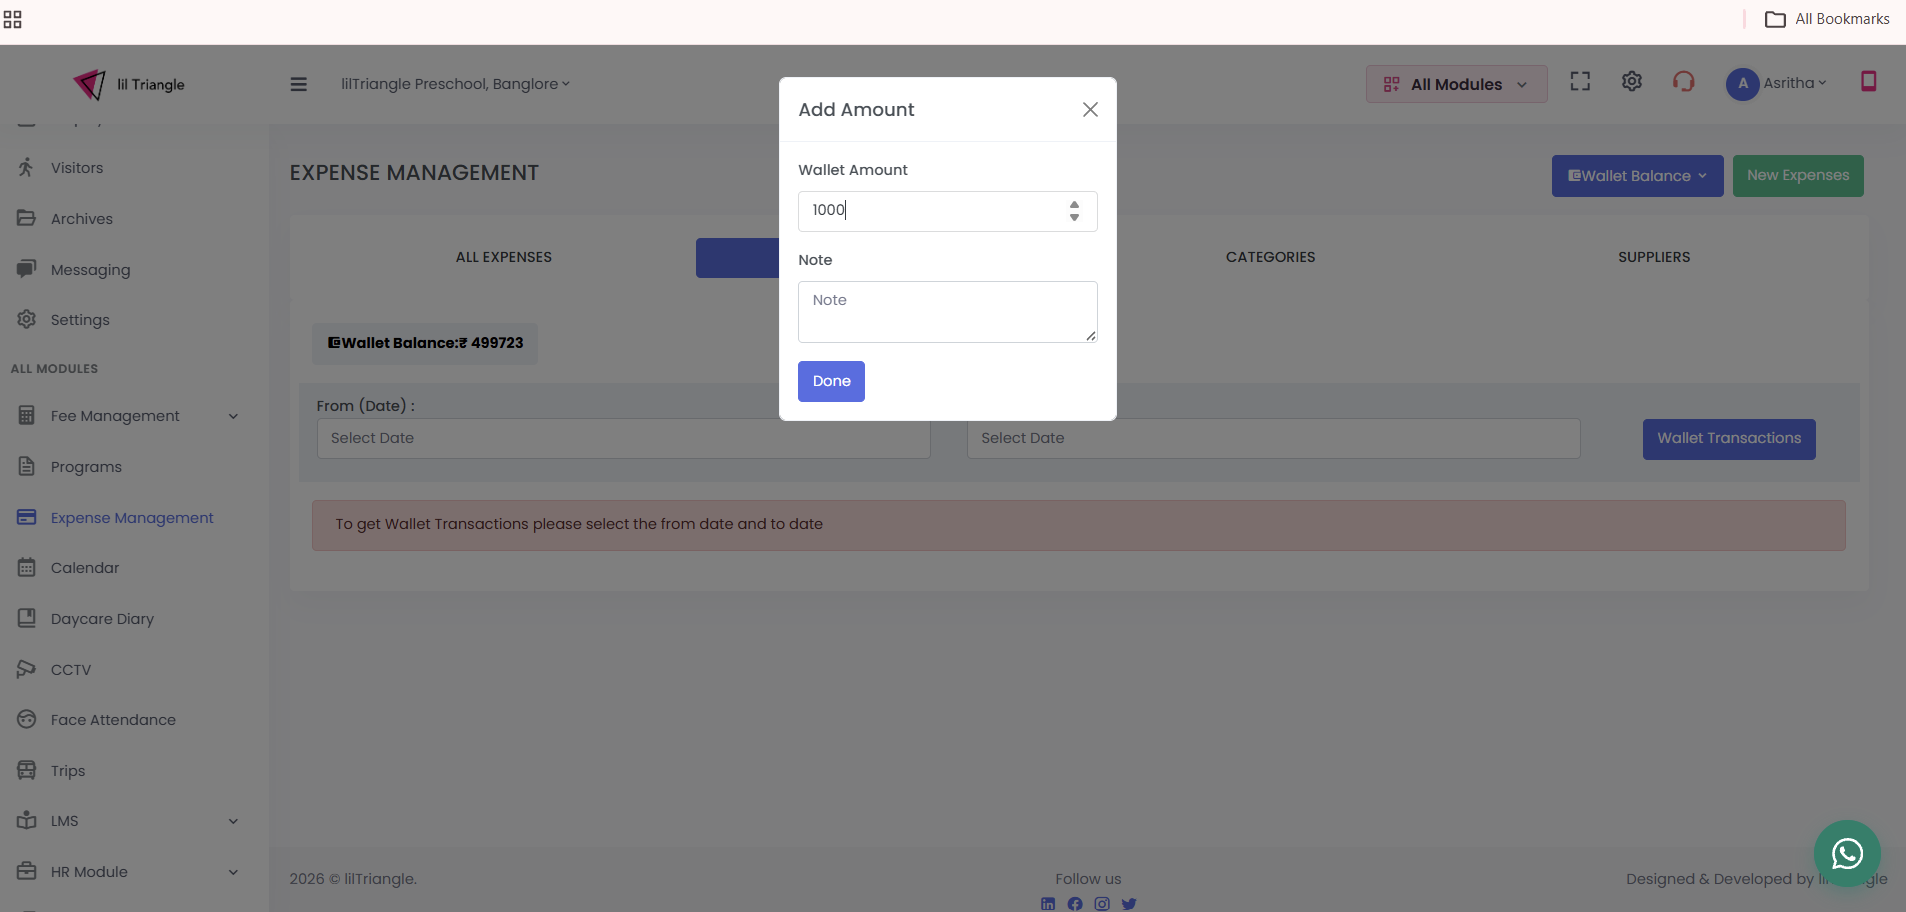
- The school can add money to its wallet.
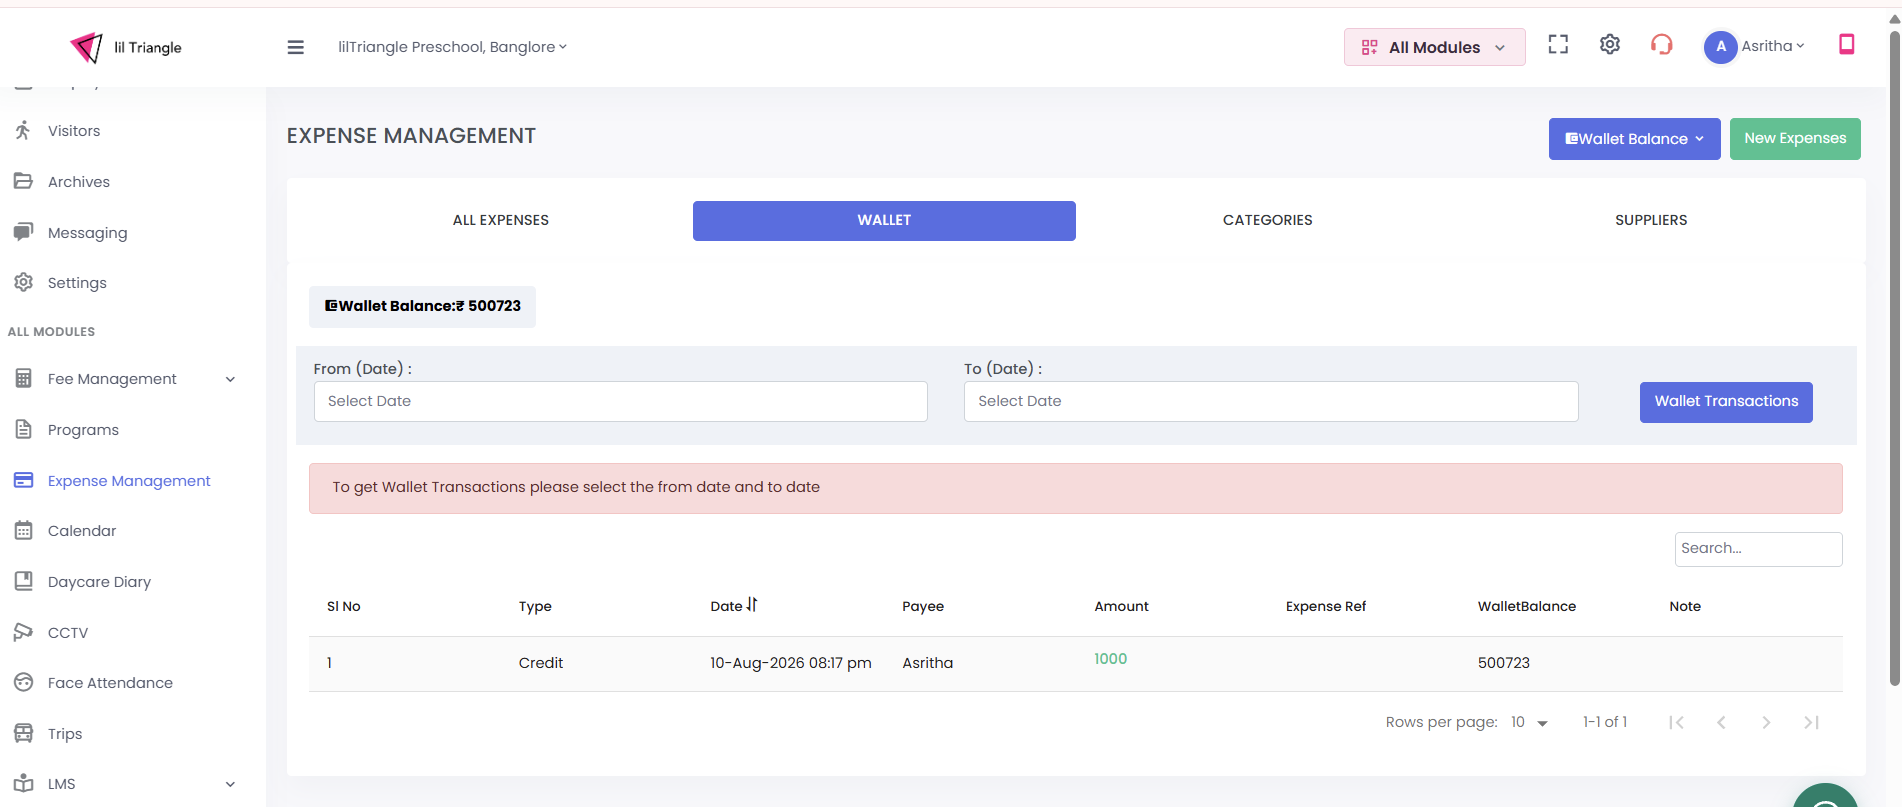
- The wallet displays the available balance.
- When a new expense is created, the expense amount is deducted from the available wallet balance.
- The updated balance helps the school monitor the funds that remain available.
- Wallet activity and expense activity can therefore be viewed together as part of the expense management process.
Example
If the school has ₹50,000 in its available wallet balance and creates a ₹5,000 expense, the available balance is reduced by ₹5,000, leaving ₹45,000 available.
The wallet therefore provides a quick way to understand available funds while expenses are being recorded.
Creating a New Expense
A new expense can be created from Expense Management using the New Expenses option.
Expense Details
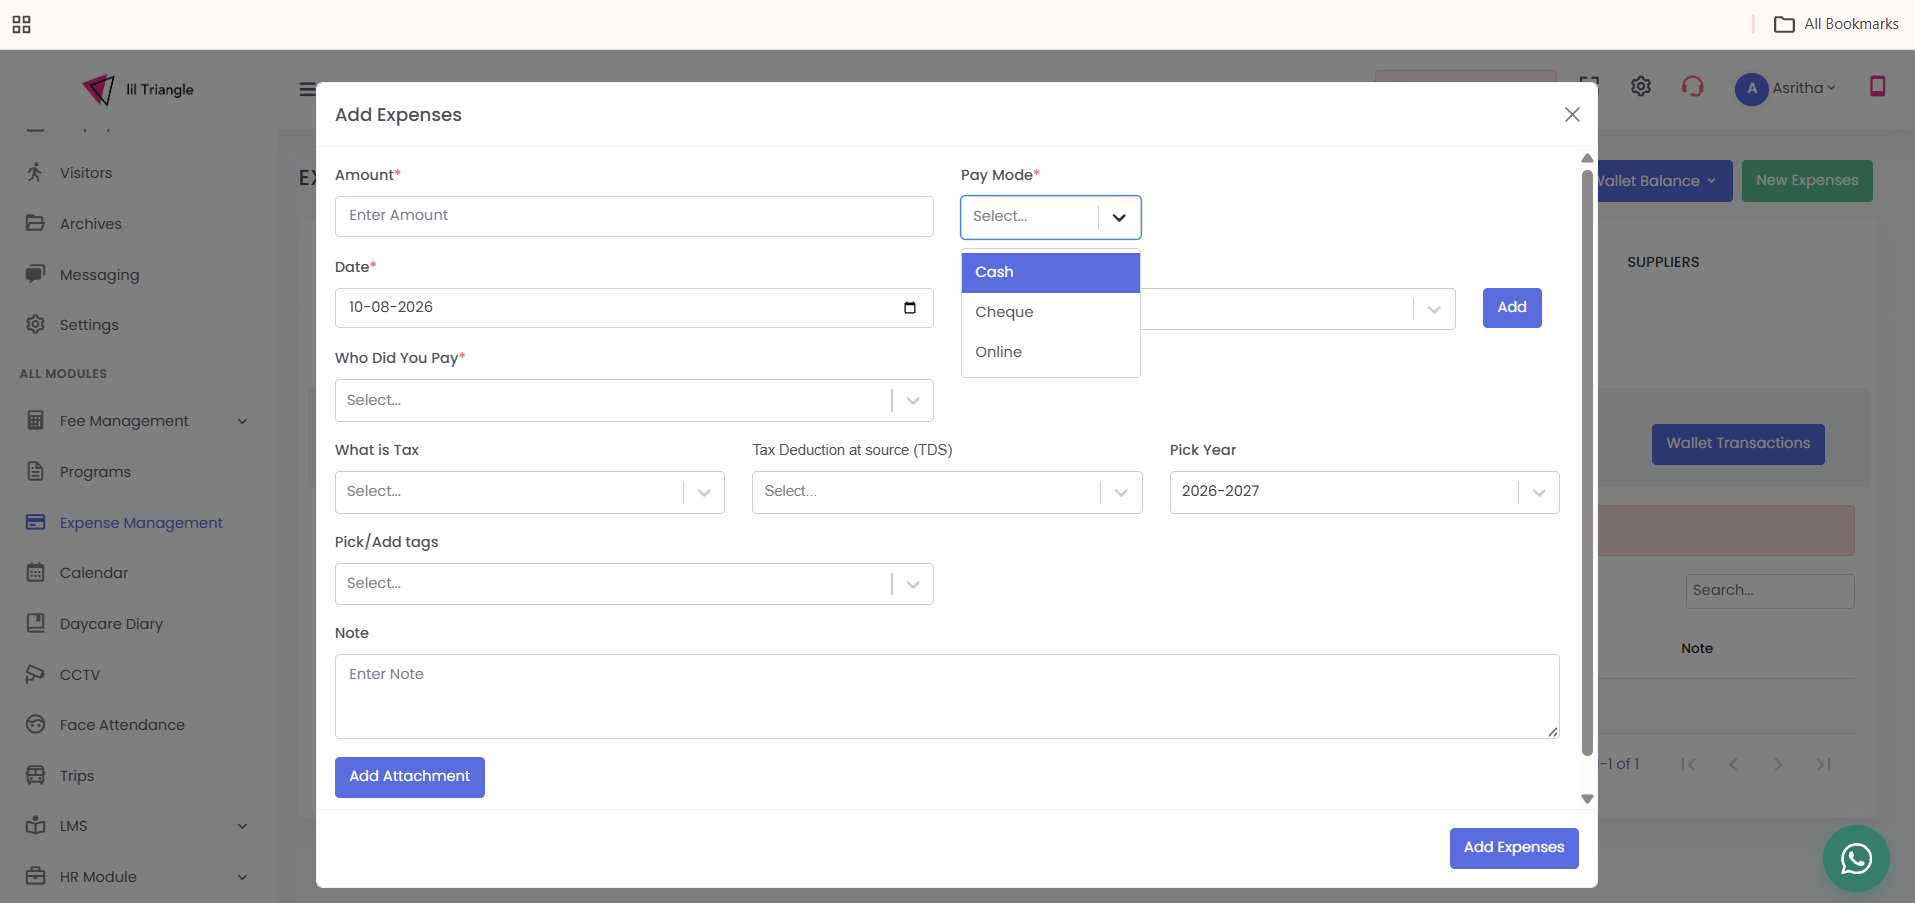
The expense form provides fields to capture the information needed to record an expense, including:
- Amount – Enter the expense amount.
- Pay Mode – Select the payment method, such as Cash or Online.
- Date – Select the date of the expense.
- What kind of expenses – Select the relevant expense category/type.
- Who Did You Pay – Identify the payee.
- Select Supplier – Select the supplier associated with the expense.
- Tax – Select the applicable tax option, where required.
- Tax Deduction at Source (TDS) – Select the applicable TDS option, where required.
- Pick Year – Select the relevant academic/financial year shown in the system.
- Tags – Add relevant tags for easier organization.
- Note – Add any additional information about the expense.
- Attachment – Add supporting documents or attachments when required.
Steps to Create an Expense
- Go to All Modules → Expense Management.
- Click New Expenses.
- Enter the amount and select the payment mode.
- Select the expense category/type and supplier/payee.
- Enter the applicable tax/TDS and year details, if required.
- Add tags, notes and attachments as needed.
- Click Add Expenses to save the expense.
- The expense is added to the expense list and the applicable amount is deducted from the available wallet balance.
Expense Categories
Categories help schools organize expenses based on the type of spending. This makes the expense list easier to understand and helps schools group similar expenses together.
Examples of categories can include Books, Equipment, Bakery, Cleaning Expenses, Stationery Items and other categories relevant to the school.
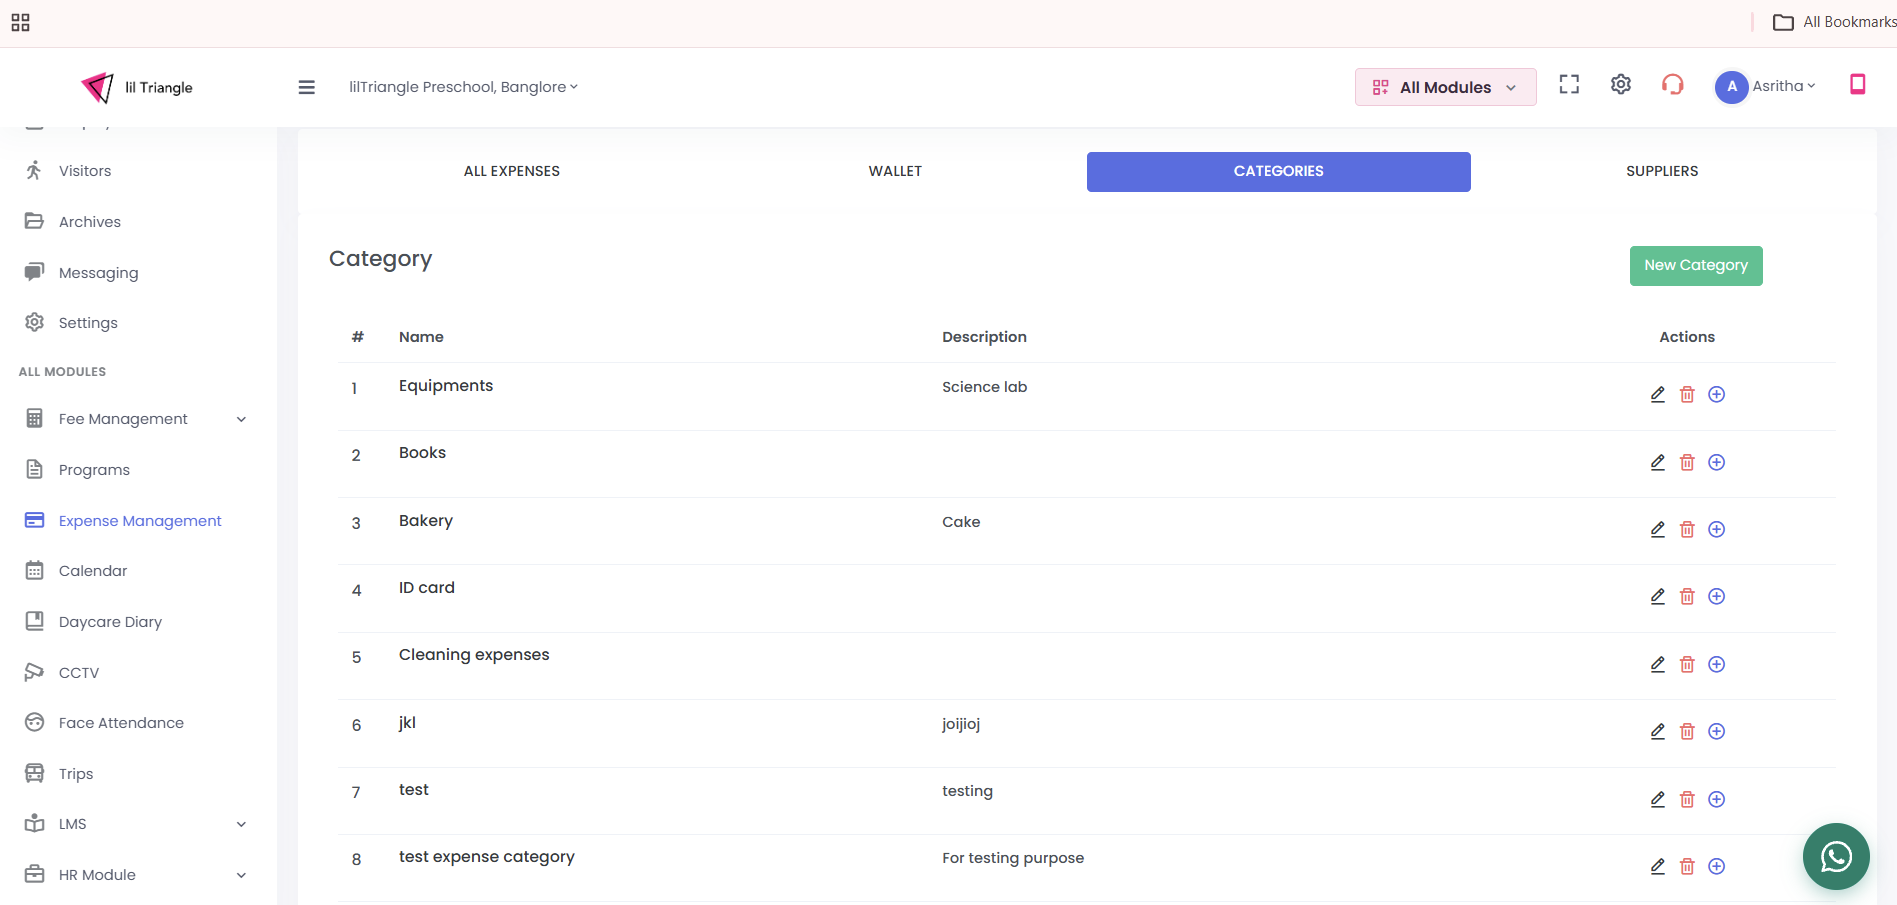
How to Create a Category
- Open Expense Management.
- Go to the Categories tab.
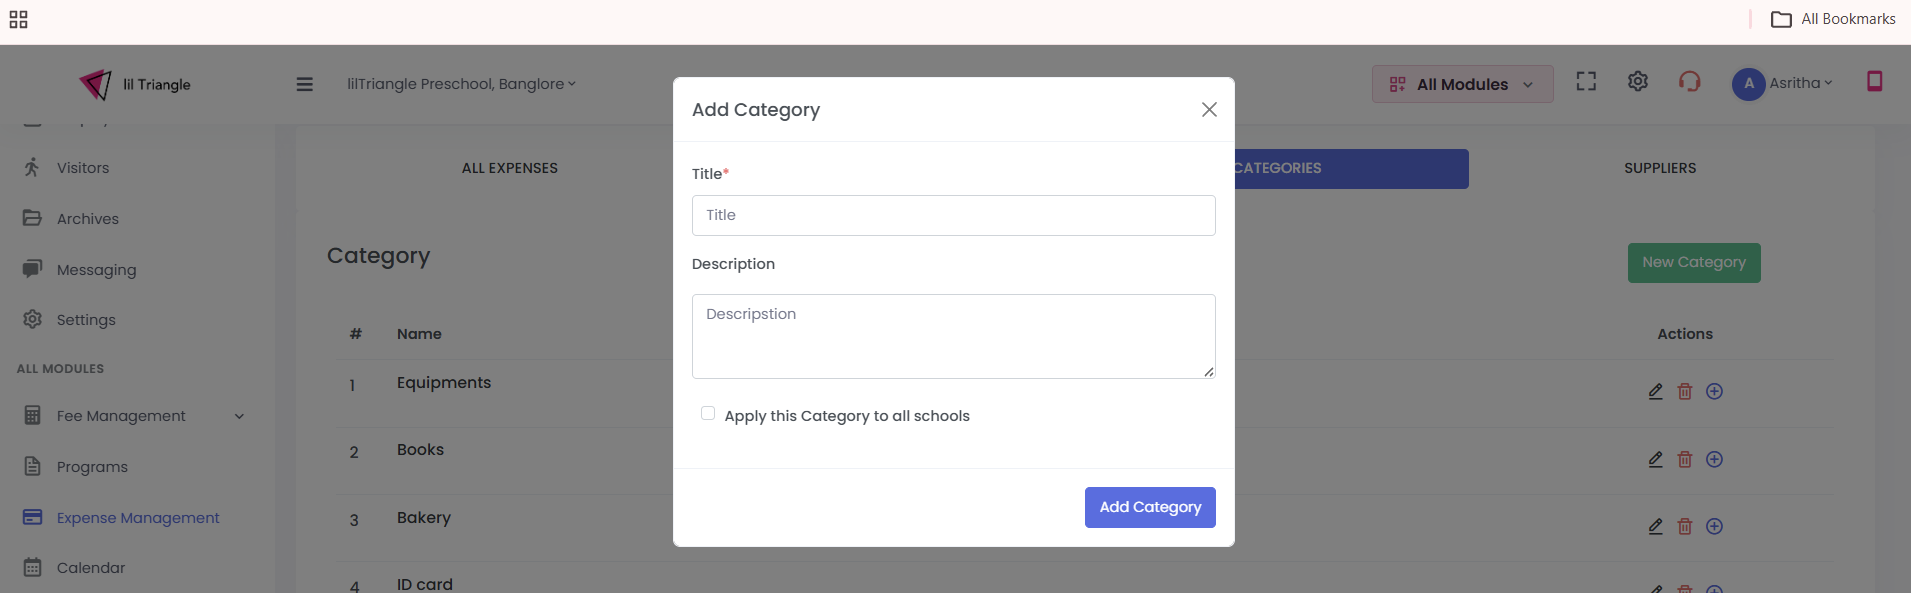
- Click New Category.
- Enter the category name and description.
- Save the category.
- The new category becomes available for use while creating expenses.
Suppliers / Payees
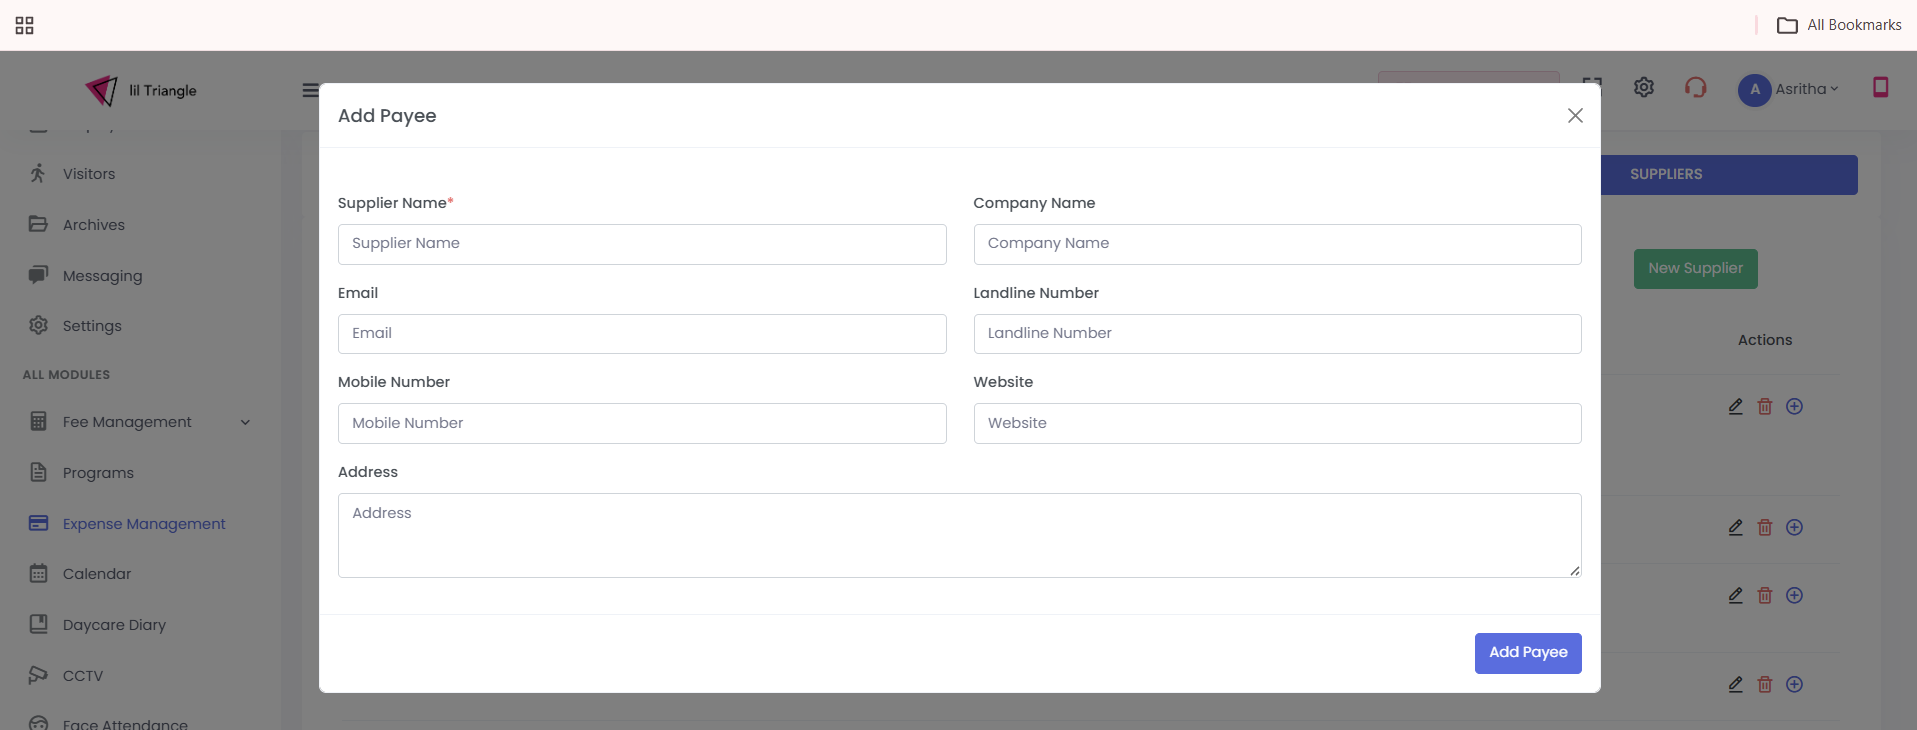
The Suppliers section helps schools maintain supplier or payee information and connect expenses with the relevant supplier.
How to Add a Supplier
- Open Expense Management.
- Go to the Suppliers tab.
- Click New Supplier.
- Enter the supplier/payee details.
- Click Add Payee.
- The supplier is added to the supplier list and can be selected while creating an expense.
Viewing and Tracking Expenses
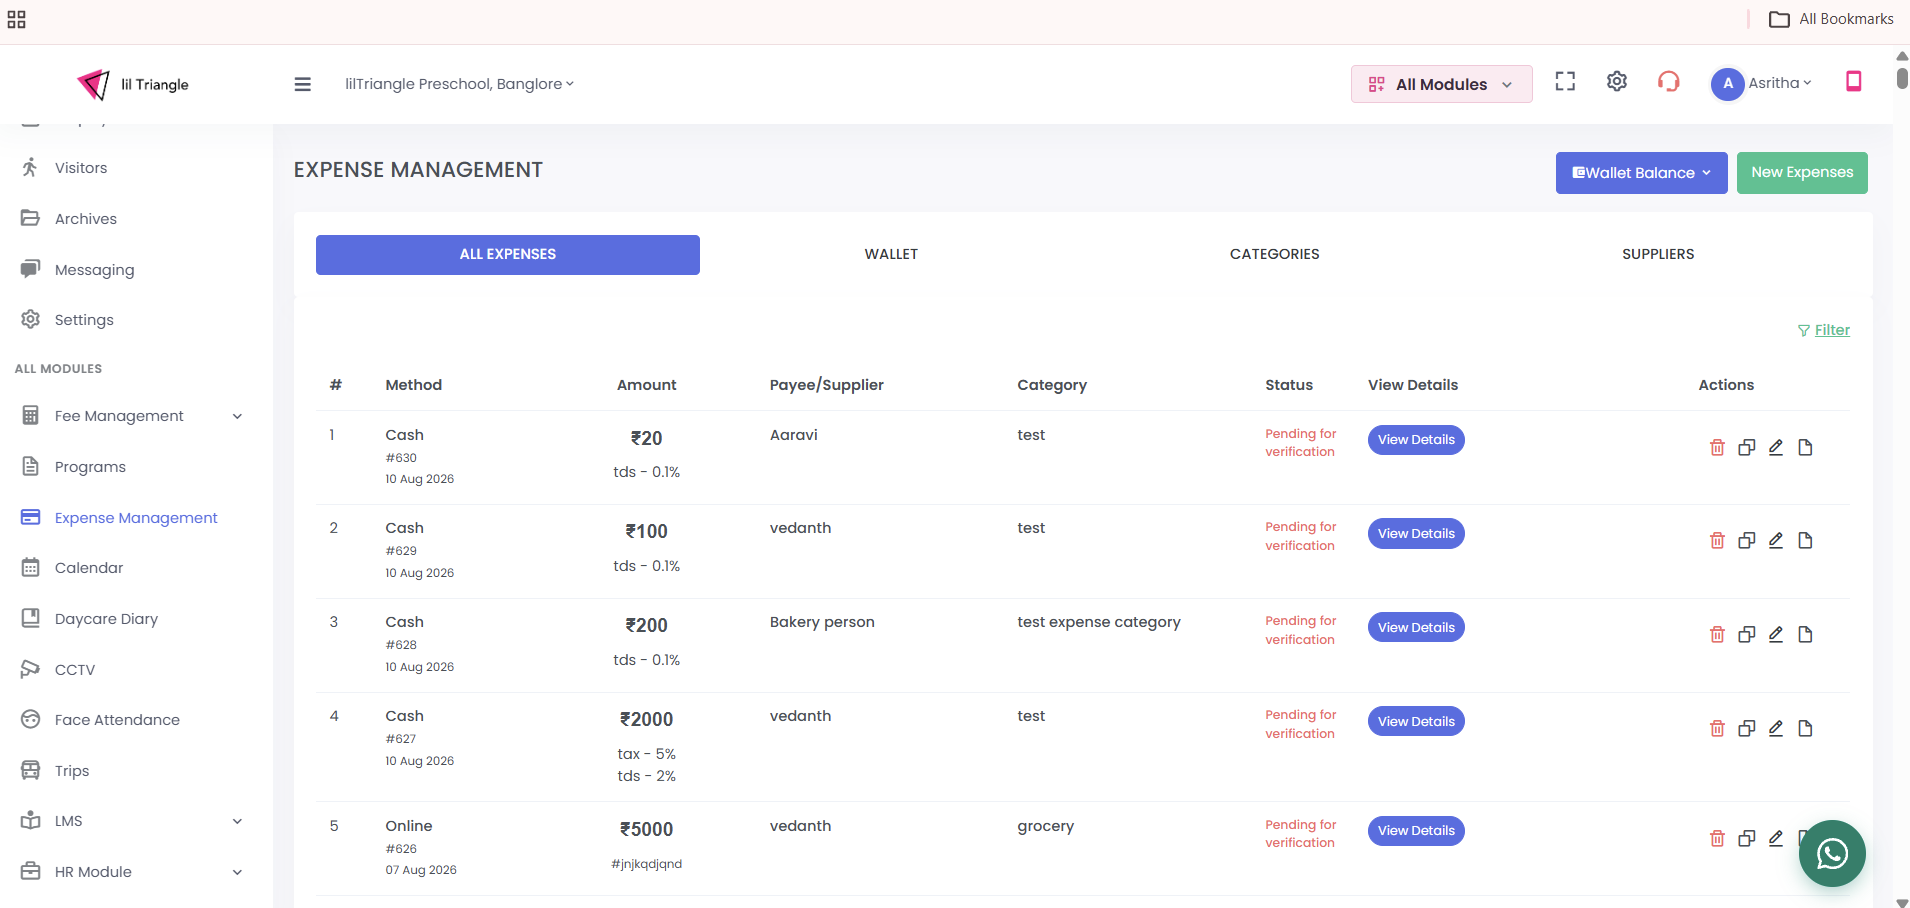
The All Expenses section provides a centralized view of recorded expenses.
Expense records can display important information such as:
- Payment Method
- Expense Amount
- Payee/Supplier
- Expense Category
- Expense Status
- View Details
- Available actions for managing the record
The expense list also provides filtering options so users can find and review relevant expense records more easily.
Expense Verification and Status
Expenses can have a verification status. The expense list can show whether an expense is verified or is pending for verification.
Users can open View Details to review the information associated with an expense and use the available actions to manage the record.
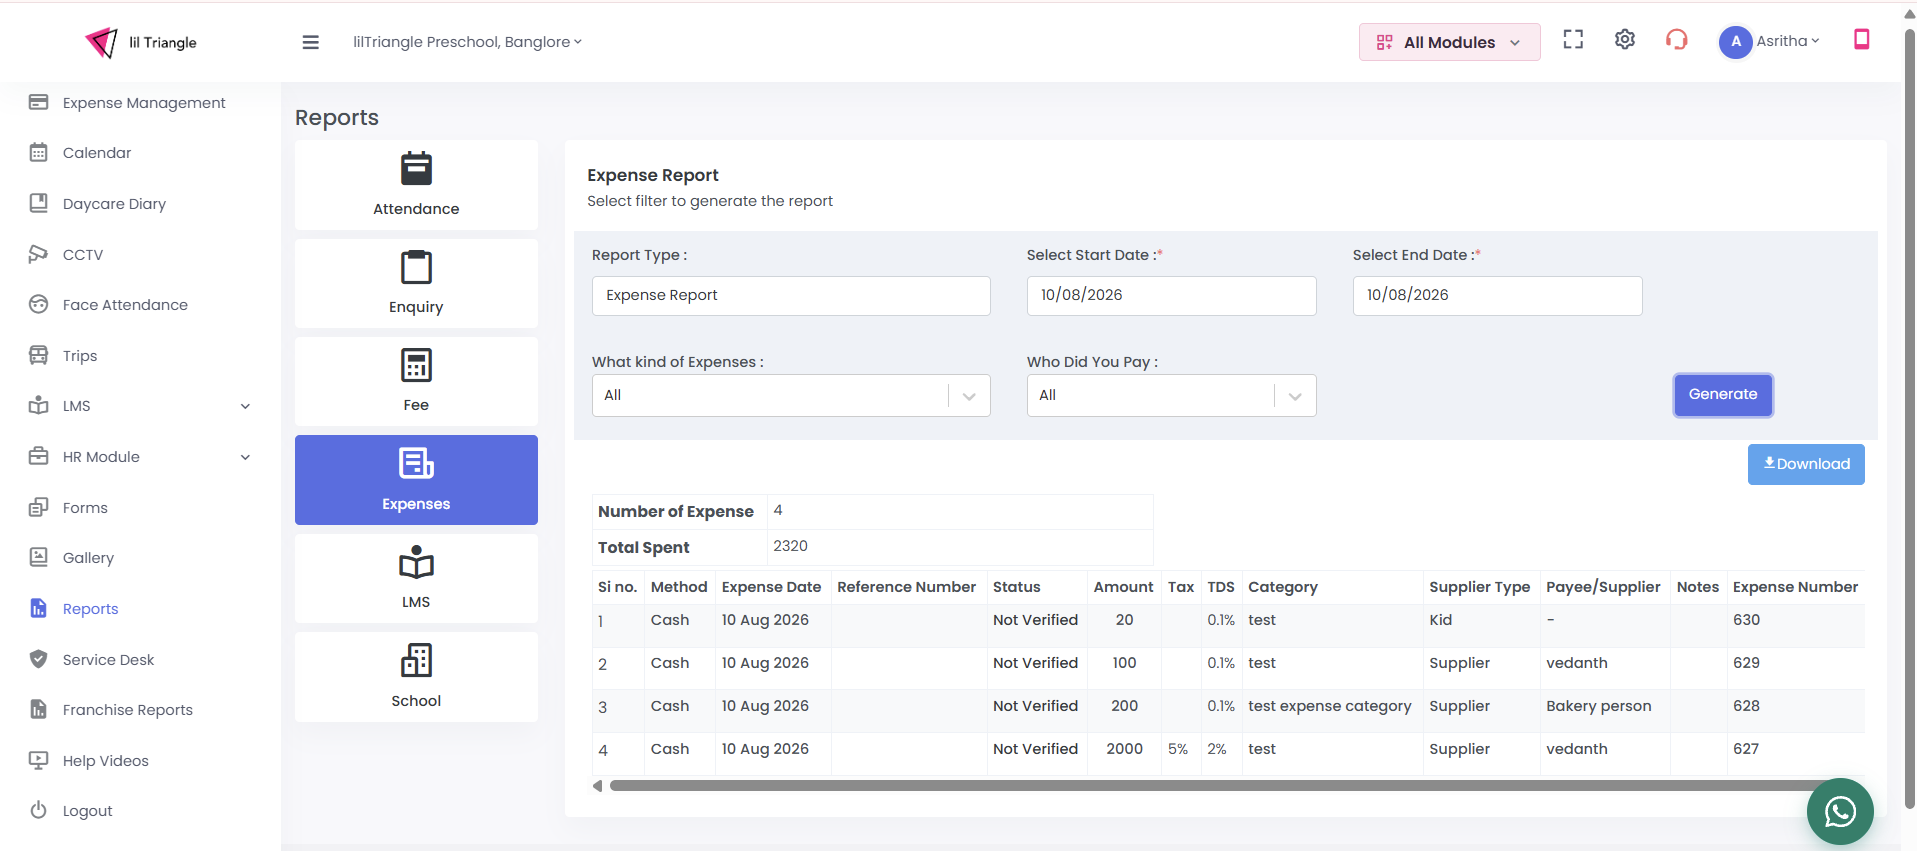
Expense Reports
- Go to the Reports module.
- Select the relevant Expense report.
- Apply the available report filters, where applicable.
- Generate the report.
- Download the expense report for further use or record keeping.
Key Benefits
- Centralized expense management in one place.
- Better organization through expense categories.
- Easy supplier/payee management.
- Clear visibility into available wallet funds.
- Wallet balance updates as expenses are recorded.
- Expense records can be reviewed and tracked.
- Supporting notes and attachments can be added to expenses.
- Expense reports can be downloaded from the Reports module.
Quick Reference
| Area | Purpose | Key Action |
|---|---|---|
| All Expenses | View and track expense records | View, filter and manage expenses |
| New Expenses | Record a new expense | Enter details and add expense |
| Wallet | Monitor available funds | Add money and view balance |
| Categories | Organize expenses | Create, edit and manage categories |
| Suppliers | Maintain supplier/payee details | Add and manage suppliers |
| Reports | Review and export expense information | Generate and download expense reports |
Quick User Flow
💰 WALLET → 🧾 EXPENSE → 🏷️ CATEGORY → 👤 SUPPLIER → 📉 BALANCE → 👀 TRACK → 📊 REPORT
Expense Management in lilTriangle gives schools a simple way to record expenses, organize spending, manage suppliers, monitor available wallet funds and access expense reports — all from one workflow.